1. Hospital Bed Assembly Assembly Overview
1.1.2 Importance of Proper Assembly
Assembly of hospital beds may not be an exciting task, but its importance cannot be overstated. A properly assembled bed ensures patient comfort and safety by creating an atmosphere conducive to relaxation and recuperation without risk or additional burdens.1.2.1 Overview of Hospital Bed Parts
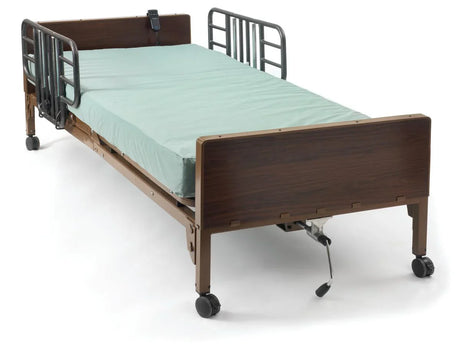
Before diving in and beginning assembly, it's helpful to have an overview of all components involved. A hospital bed typically comprises of a frame/base assembly, mattress platform/side rail assembly and optional electrical components - each component plays an essential part in providing comfort, stability and safety to its user.2. Learn About Hospital Bed Components
Bed Frame and Base Components
Bed frames and bases serve as the cornerstones of hospital beds, offering stability and support to the mattress platform and other components such as leg or caster attachments for mobility or mechanisms to adjust bed height. These parts often consist of sturdy metal or wooden frames as well as leg/caster attachments to facilitate adjustment of height settings for proper patient positioning.Mattress Platform and Adjustability Features (2.2 Mattress Platform w/ Adjustability Features).
Mattress platforms provide comfort and support, often constructed of spring coils or foam. Hospital beds also typically include adjustable features to meet patient's unique needs such as raising head or leg elevation.
Side Rails and Safety Mechanisms
Side rails play an essential role in patient safety, helping prevent accidental falls or rolling off of beds. They generally attach directly to bed frames and form protective barriers on one or both sides. Furthermore, locking mechanisms or alarm systems may also be added for added protection.Electrical Components (Optional)
Some hospital beds include electrical components for added comfort and adjustability, such as motorized mechanisms to easily adjust height, head, and leg positions. If your hospital bed contains these features, be sure to follow any specific manufacturer instructions regarding use.3. Prep Workspace and Tools for Success
3.1 Prep the Area and Create Adequate Space
Before the assembly begins, you should prepare the area where the bed will go by clearing away anything that could get in its way - like lampshades or furniture that could get knocked over inadvertently! Make sure there's enough room to get this process underway without running into any obstacles; otherwise you might end up accidentally knocking something over or tripping over during assembly!Gather Required Tools and Equipment (3.1)
Make the assembly process a smooth experience by gathering all necessary tools and equipment before beginning assembly. At minimum, basic tools will include screwdriver, adjustable wrench and rubber mallet; be sure to read over instructions from manufacturer first!4. Step-by-Step Guide to Assembling the Hospital Bed Frame
Unpack and Assemble Bed Frame Components Step 4.1
Start by unpacking and organizing all bed frame components. Lay them out neatly to ensure everything needed for assembly is present, then read over your assembly instructions so as to familiarize yourself with their steps.Attaching Bed Legs or Casters
Attach the bed legs or casters according to the instructions. This step may require using a screwdriver or wrench for tightening purposes. If your bed features casters, make sure they are locked into place to prevent accidental movement.Connect Bed Rails and Crossbars Together
Next, connect the bed rails and crossbars to complete your frame. Depending on its design, this may involve aligning components while using screws or fasteners to fasten them together securely. Always pay careful attention to any instructions regarding assembly of these parts.Assembly may seem intimidating at first glance, but with careful attention paid to instructions and patience the task should go quickly. You're creating an ideal resting spot for patients in no time at all; that makes the effort worth your while!
5. Install and Adjust Mattress Platform
5.1 Assembling the Mattress Retainer and Supports
Now it is time to put together your mattress platform! First up is attaching the mattress retainer and platform supports; these pieces of equipment will ensure that your mattress will stay securely in its place.
Locate the bedframe's slots or brackets, align and slide in your mattress retainer until it clicks into position, giving a gentle push if needed to ensure secure placement.
At this stage, install platform supports. These should be attached directly to the frame for stability and support of your mattress. Align them with their designated slots before pushing into position for best results.
Adjusting Platform Heights and Tilt
Now that your mattress platform is installed, take some time to ensure it satisfies both height and tilt requirements for optimum comfort.Most hospital beds feature adjustable features to let users customize the height and tilt of their platforms to their preference. Look out for controls or levers near the bed frame.
Changing the height is simple - all it requires is finding and using the relevant controls to raise or lower the platform to your preferred height. As always, make sure the bed is secure before making adjustments or any alterations.
Adjust the tilt of your platform by finding and adjusting its tilt control mechanism accordingly; this should enable you to find an ergonomic position for sleeping or sitting up.
Finding your desired height and tilt setting takes practice - take your time in finding one you find acceptable and make adjustments until it feels just right for you!
6. Installing Side Rails and Safety Features
Installing the Side Rails
Safety first! Attaching side rails to your hospital bed is vital in avoiding accidental falls and creating an atmosphere that promotes stability for maximum recovery.Install the side rails by first finding their designated slots on the bed frame, aligning each rail with those slots and gently sliding them in place - giving an extra firm push at this stage for extra assurance of attachment.
Adjust and Lock Side Rails (6.2 Adjust and Lock the Side Rails (6.3 Adjust and Lock Side Rails
Once side rails have been attached, it's essential that they be adjusted and locked into place so as to provide maximum support and safety. Doing this ensures additional peace of mind.Find and loosen the height adjustment mechanism near the rails; raise or lower them to your preferred height before tightening it back securely to prevent accidental falls while providing easy entry/exit from bed.
Once you've reached the ideal height, use the locking mechanism to secure the rails so they remain safely in position. This ensures they remain safely aligned.
Add Security Features, Such as Bed Exit Alarms
Add safety features like bed exit alarms for added peace of mind when selecting hospital beds, such as alarms that notify caregivers or family members if a patient attempts to leave unsupervised. These alarms provide important alerts should any patient try leaving unaccompanied.Consult the bed's instruction manual for advice and instructions on assembling bed exit alarms; these simple measures could make a tremendous difference in protecting patients.
7. Connecting Electrical Components (if relevant).
7.1 Determining Electrical Connections
If your hospital bed contains electrical components like motors or controls, connecting them correctly is key for its functionality.Take the time to identify all electrical connections on the bed and their accompanying cables or plugs - these should usually be found near either the control panel or foot of the bed.
7.2 Accurate Wiring and Connectivity Methods (PCITP)
When connecting the electrical components, it's imperative that they adhere strictly to manufacturer instructions. Faulty wiring could result in malfunctioning components or even electrical hazards posing serious danger to lives and properties.Make sure the correct connectors and plugs are placed into their appropriate connections on the bed. Gently install all plugs until they are secure in their position.
If any step seems confusing to you, do not hesitate to consult the instruction manual or seek professional assistance - your safety must always come first!
8. Final Check and Testing the Assembled Hospital Bed
Verifying Stability and Proper Alignment.
Before using or jumping into bed, take the time to inspect its stability and alignment before leaping right in. This ensures a successful experience for everyone involved.Give the bed a gentle shake to ensure all components are securely attached and that nothing loose or out-of-place exists.
Verifying that the mattress is properly aligned on the platform and secured side rails makes all the difference when it comes to providing an enjoyable sleeping experience. These small checks will make a considerable impact in creating an atmosphere conducive to safety and comfort for you!
8.2 Testing Bed Functionality and Safety Mechanisms
At last, it's time to put your newly assembled hospital bed through its paces! Put all the adjustable features like height adjustment and tilt control through their paces - make sure they work smoothly as intended and efficiently.Test any safety mechanisms such as bed exit alarms and locking mechanisms on the side rails to make sure everything works as designed and you can rely on your bed for its intended purposes.
Once all checks and tests have been successfully conducted, your hospital bed assembly journey has come to a close. Now it is time to relax and take advantage of its comfort and convenience! Get some rest!
By following this step-by-step guide, you can assemble a hospital bed safely and confidently - creating an inviting space that fosters healing and comfort for patients or loved ones in need of care. Please always refer to manufacturer instructions specific to your bed model if experiencing difficulties; professional assistance should also be sought if unsure or confused by assembly issues. Proper assembly ensures functionality and reliability - with this article's knowledge, assembly should become effortless with precision! You should feel proud in creating supportive space that promotes healing.


